Angular 9 EventEmitter – Custom Events : Example
In this tutorial let’s see how to implement Angular 9 EventEmitter example. The main purpose of an EventEmitter in Angular is to create custom events and fire them as per your requirement.
The following is the complete example which demonstrates an usage of EventEmitter in Angular.
Angular 9 EventEmitter – Custom Events Example
First, Let’s create a component class as shown below.
server.component.ts
import { Component, OnInit, EventEmitter, Input, Output } from '@angular/core';

@Component({

	selector:'app-server',
	templateUrl:'./server.component.html'
})

export class ServerComponent implements OnInit {

	serverRefreshStatus: string;
	serverId: number;
	serverStatus: string = 'online';

	@Output() refreshRequest = new EventEmitter<boolean>();
	isServerRefreshed = false;


	constructor() {

            console.log('Inside ServerComponent class constructor');
            this.serverRefreshStatus = 'Server was not refreshed!';
            this.serverId = 10;

	}

	ngOnInit() {

            console.log('Component has been initialized');

	}

	getServerStatus(){

		return this.serverStatus;
	}

	onRefresh(refreshed: boolean){
		this.refreshRequest.emit(refreshed);
		this.isServerRefreshed = true;
		this.serverRefreshStatus = 'Server Refreshed!';
		this.serverStatus = "refreshed and restarted"
	}


}
Next, let’s create server.component.html angular template as shown. This view has a button to refresh server and it responds to user actions.
<p>{{'Server'}} with ID {{serverId}} is {{getServerStatus()}}</p>
<p>{{ serverRefreshStatus }}</p>
<button class="btn btn-primary" [disabled]="isServerRefreshed" (click)="onRefresh(true)">Refresh</button>
Then your app.component.ts (root/parent component) should look like below.
app.component.ts
import { Component } from '@angular/core';

@Component({
  selector: 'myapp-root',
  templateUrl: './app.component.html',
  styles:[`
  	h3{
  		color:red;
  	}
  `]
})
export class AppComponent {

  displayNone = 'none';

  restartServer(event:Event){

    console.log('Restarting server...');
    console.log(event);
    this.displayNone = this.displayNone?'':'none';

   }

}
Finally, modify your app component template (app.component.html) like below.
app.component.html
<div class="container">
	<div class="row">
		<div class="col-xs-12">
			<h3>My First Component !</h3>
			<hr>
			<app-server (refreshRequest)="restartServer($event)"></app-server>
			<p></p>
			<p>
				<label [style.display]="displayNone">Servers Restarting....</label>
			</p>
		</div>
	</div>
</div>
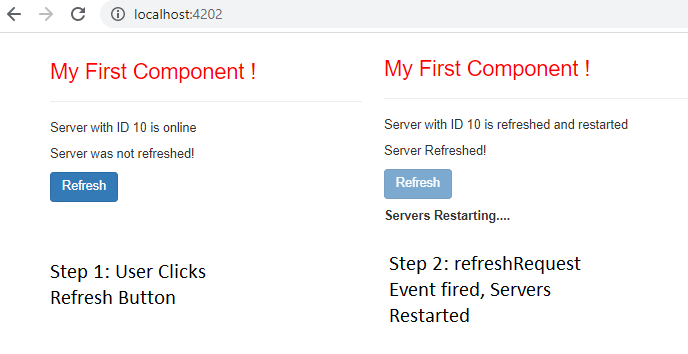
That’s it, now try to run this code to observe the following behavior; when user clicks refresh button the server will be refreshed and restarted (upon refreshRequest event is fired).
When the refreshRequest event is fired the label “Servers Restarting….” will be shown, otherwise it would be hidden by default.
Output
That’s it hope it helped 🙂
Also See:
- Get index of ngFor element using index as value in attribute
- Set default value in the dropdown list in Angular 9
- Dynamic and conditional CSS classes with ngClass : Angular
- Apply CSS style attribute dynamically with ngStyle : Angular 9
- Two-Way Data Binding – Example
- HTML Property Binding in Angular : Data Binding
- Port 4200 is already in use while running ng serve Angular CLI command
- String Interpolation in Angular 9
- This version of CLI is only compatible with Angular versions
- Your global Angular CLI version is greater than your local version
- Create custom events and fire in Angular 9 with EventEmitter – Example
- Display different colors for odd/even rows using ngFor loop and ngClass
- ERROR in multi /bootstrap.min.css ./src/styles.css in Angular 9
- Bind selected element from drop down to an object in Angular 9
- TrackBy with *ngFor in Angular 9 : Example

