How to Pass data from child to parent component – Angular 9 ?
This tutorial guides you on how to pass data from child to parent component in Angular 9 application. Let’s see an Angular 9 example code for custom components and databinding, and in that you can learn how to pass data from a child component to parent component.
Pass data from child to parent component – Angular 9
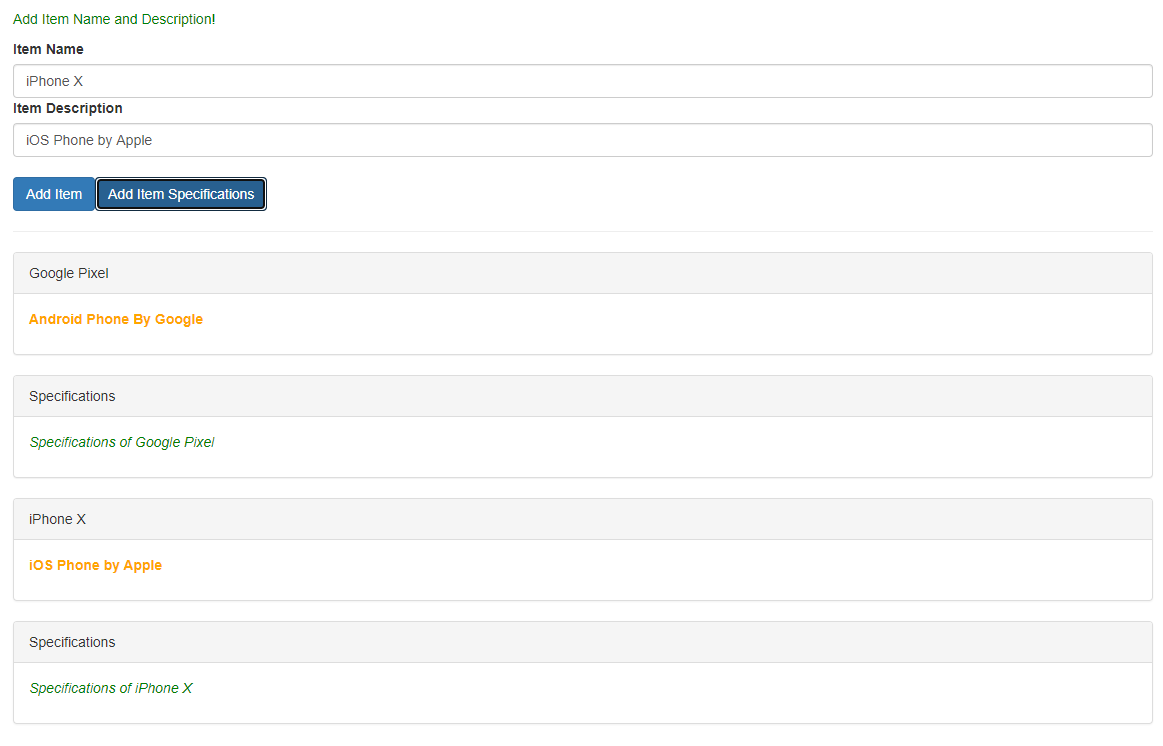
The following is an Angular example code for custom components and data binding. In this example, we are allowing user to define item name or title and item description. And you can add either item or item specifications as shown in the following picture.
In this example, let’s say a separate component is created for section where we enter item name and item description with buttons. Let’s call it as “create-item” component.
Also a separate component is created for individual items that are getting generated dynamically. let’s call it as “item-element” component. And app component is our parent component.
The same example code we have used to learn how to pass data from parent to custom child component. Similarly, in this tutorial let’s see how we are trying to pass data from child to parent component i.e., the other way round.
How to pass data from child components to parent component ?
Angular provides a way for you to emit custom events synchronously or asynchronously from the components if you use EventEmitter in components with @Output directive. @Output decorator marks a class field as an output property.
And the DOM property in the parent component’s template is bound to the output property that is defined in the child component.
Basically, what you need to do is create custom events, emit them by creating EventEmitter property and exposing it using @Output directive in the child component as shown below.
export class CreateItemComponent implements OnInit {

  @Output() itemAdded = new EventEmitter<{itemTitle: string, itemDesc: string}>();
  @Output() itemSpecAdded = new EventEmitter<{itemTitle: string, itemSpec: string}>();

  newItemName = '';
  newItemDesc = '';
  newItemSpec = '';

  constructor() { }

  ngOnInit(): void {
  }

  onAddItem() {
    this.itemAdded.emit({
        itemTitle: this.newItemName,
        itemDesc: this.newItemDesc
    });
  }

  onAddItemSpec() {
    this.itemSpecAdded.emit({
      itemTitle: this.newItemName,
      itemSpec: this.newItemSpec
    });
  }

}
For example, in our CreateItemComponent class we emit custom events by using EventEmitter property with @Output directive as shown below.
@Output() itemAdded = new EventEmitter<{itemTitle: string, itemDesc: string}>();
@Output() itemSpecAdded = new EventEmitter<{itemTitle: string, itemSpec: string}>();
Emit data whenever “Add Item” button or “Add Item Specifications” button is clicked.
<button
   class="btn btn-primary"
   (click)="onAddItem()">Add Item</button>
<button
   class="btn btn-primary"
   (click)="onAddItemSpec()">Add Item Specifications</button>
Finally, listen for that custom events in the parent component’s template as shown below.
<div class="container">
  <app-create-item (itemAdded)="onItemAdded($event)"
                   (itemSpecAdded)="onItemSpecAdded($event)"></app-create-item>

----
----
</div>
Lastly, in the parent component’s class (AppComponent) you need to have the following methods. Therefore, you can handle the data that is passed from the child component to the parent component.
Basically, you are using Array’s push method to update the data in “itemElems” passed from child component.
export class AppComponent {
  itemElems = [{type: 'item', title:'Google Pixel', desc:'Android phone by Google', spec:''},
  {type: 'spec', title:'Specifications', desc:'', spec:"Specifications of Google Pixel"}];

  onItemAdded(itemData:{itemTitle: string, itemDesc: string}) {
    this.itemElems.push({
      type: 'item',
      title: itemData.itemTitle,
      desc: itemData.itemDesc,
      spec:''
    });
  }

  onItemSpecAdded(itemSpecData:{itemTitle: string, itemSpec: string}) {
    this.itemElems.push({
      type: 'spec',
      //title: itemSpecData.itemTitle,
      title: 'Specifications',
      desc:'',
      //spec: itemSpecData.itemTitle
      spec: 'Specifications of '+ itemSpecData.itemTitle
    });
  }
}
Pass data from child components to parent component – Example
The following are the complete code sneppets for the above example output shown in the picture. Below are the code sneppets for parent component and “create-item” & “item-element” components (child components).
app.component.html
<div class="container">
  <app-create-item (itemAdded)="onItemAdded($event)"
                   (itemSpecAdded)="onItemSpecAdded($event)"></app-create-item>
  <hr>
  <div class="row">
    <div class="col-xs-12">
      <app-item-element *ngFor="let elem of itemElems"
                        [itemElement] = "elem"></app-item-element>
    </div>
  </div>
</div>
app.component.ts
import { Component } from '@angular/core';

@Component({
  selector: 'app-root',
  templateUrl: './app.component.html',
  styleUrls: ['./app.component.css']
})
export class AppComponent {
  itemElems = [{type: 'item', title:'Google Pixel', desc:'Android phone by Google', spec:''},
  {type: 'spec', title:'Specifications', desc:'', spec:"Specifications of Google Pixel"}];

  onItemAdded(itemData:{itemTitle: string, itemDesc: string}) {
    this.itemElems.push({
      type: 'item',
      title: itemData.itemTitle,
      desc: itemData.itemDesc,
      spec:''
    });
  }

  onItemSpecAdded(itemSpecData:{itemTitle: string, itemSpec: string}) {
    this.itemElems.push({
      type: 'spec',
      //title: itemSpecData.itemTitle,
      title: 'Specifications',
      desc:'',
      //spec: itemSpecData.itemTitle
      spec: 'Specifications of '+ itemSpecData.itemTitle
    });
  }

}
create-item.component.html
<div class="row">
    <div class="col-xs-12">
      <p>Create Items and Specifications!</p>
      <label>Item Name</label>
      <input type="text" class="form-control" [(ngModel)]="newItemName">
      <label>Item Description</label>
      <input type="text" class="form-control" [(ngModel)]="newItemDesc">
      <br>
      <button
        class="btn btn-primary"
        (click)="onAddItem()">Add Item</button>
      <button
        class="btn btn-primary"
        (click)="onAddItemSpec()">Add Item Specifications</button>
    </div>
  </div>
create-item.component.ts
import { Component, OnInit, EventEmitter, Output } from '@angular/core';

@Component({
  selector: 'app-create-item',
  templateUrl: './create-item.component.html',
  styleUrls: ['./create-item.component.css']
})
export class CreateItemComponent implements OnInit {

  @Output() itemAdded = new EventEmitter<{itemTitle: string, itemDesc: string}>();
  @Output() itemSpecAdded = new EventEmitter<{itemTitle: string, itemSpec: string}>();

  newItemName = '';
  newItemDesc = '';
  newItemSpec = '';

  constructor() { }

  ngOnInit(): void {
  }

  onAddItem() {
    this.itemAdded.emit({
        itemTitle: this.newItemName,
        itemDesc: this.newItemDesc
    });
  }

  onAddItemSpec() {
    this.itemSpecAdded.emit({
      itemTitle: this.newItemName,
      itemSpec: this.newItemSpec
    });
  }

}
item-element.component.html
<div
class="panel panel-default">
<div class="panel-heading">{{ itemElem.title }}</div>
<div class="panel-body">
  <p>
    <strong *ngIf="itemElem.type === 'item'" style="color: orange">{{ itemElem.desc }}</strong>
    <em *ngIf="itemElem.type === 'spec'">{{ itemElem.spec }}</em>
  </p>
</div>
</div>
item-element.component.ts
import { Component, Input, OnInit } from '@angular/core';

@Component({
  selector: 'app-item-element',
  templateUrl: './item-element.component.html',
  styleUrls: ['./item-element.component.css']
})
export class ItemElementComponent implements OnInit {

  @Input('itemElement') itemElem : {type: string, title: string, desc: string, spec: string};

  constructor() { }

  ngOnInit(): void {
  }

}
That’s it. Hope you had learnt about custom components and data binding.
Now you know how to pass data from child to parent component in Angular 9 application.
Hope it helped 🙂
Also See:
- Angular 9 : Can’t bind to ‘itemElem’ since it isn’t a known property of
- Pass variable from parent to custom child component – Angular 9 ?
- Best way to bundle an angular app for production deployment ?
- How to Modularize Angular Application – Angular 9 ?
- ERROR in multi /bootstrap.min.css ./src/styles.css in Angular 9
- Global Angular CLI version is greater than your local version
- TrackBy with *ngFor in Angular 9 : Example

