Event Binding in Angular 9 with Example
This tutorial guides you on Event binding in Angular 9 with example. Event binding in Angular is used to handle events such as keystrokes, mouse movements, clicks and touches. Let’s learn how to use Event binding in angular application with live example.
Event binding in Angular 9
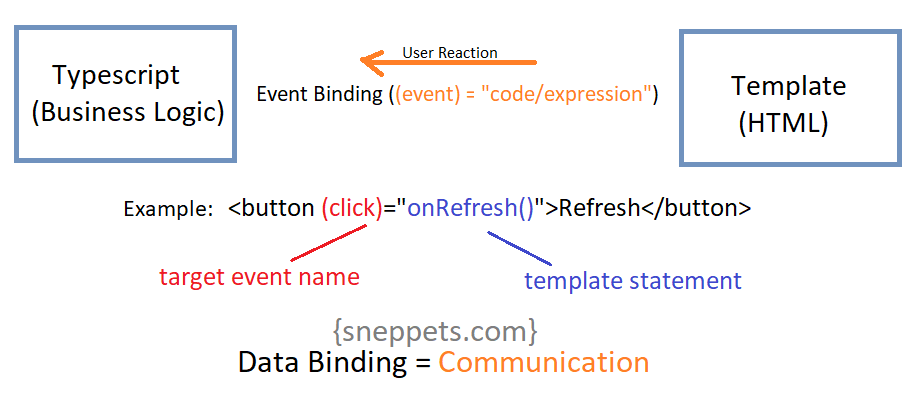
Event binding in Angular consists of target event name within parenthesis on the left hand side of the equal sign, and a quoted template statement on the right. The following example event binding handles the button’s click events by calling the component’s onRefresh() method whenever a click event occurs.
In the above example, the target event is the button’s click event.
Alternatively, you can write template statement like the following.
<button (click)="onRefresh($event)">Refresh</button>
And you can also use on- prefix as shown below, known as canonical form.
<button on-click="onRefresh($event)">Refresh</button>
Mostly you would use the more common target event names like “click”. You may also use custom events like “myRefresh” as shown below. In this case Angular first checks if the target event name matches an event property of known directive. If the target event name fails to match an element event, then Angular reports “unknown directive” error.
<button (myRefresh)="refreshMessage=$event" clickable>My Refresh</button>

{{refreshMessage}}
Note, you can create custom events in Angular using EventEmitter. Directives typically raise custom events with an Angular EventEmitter.
Event binding Example
Event binding is of type one-way data binding i.e., the communication happens from the template to typescript class when event (user-initiated) occurs in the template.
Let’s use the following server.component.html file as shown below. Please note, for events, you don’t bind to onclick but only to click.
<p>{{'Server'}} with ID {{serverId}} is {{getServerStatus()}}</p>
<p>{{ serverRefreshStatus }}</p>
<button class="btn btn-primary" (click)="onRefresh()">Refresh</button>
<!-- <button class="btn btn-primary" (click)="onRefresh($event)">Refresh</button> -->
<!-- <button class="btn btn-primary" on-click="onRefresh($event)">Refresh</button> -->
And your typescript file “server.component.ts” should look like below.
import { Component } from '@angular/core';

@Component({

	selector:'app-server',
	templateUrl:'./server.component.html'
})

export class ServerComponent {

	serverRefreshStatus: string;
	serverId: number;
	serverStatus: string = 'online';

	constructor() {
		console.log('Inside ServerComponent class constructor');
		this.serverRefreshStatus = 'Server was not refreshed!';
		this.serverId = 10;
	}

	getServerStatus(){
		return this.serverStatus;
	}

	onServerRefresh(){
		this.serverRefreshStatus = 'Server Refreshed!';
	}

}
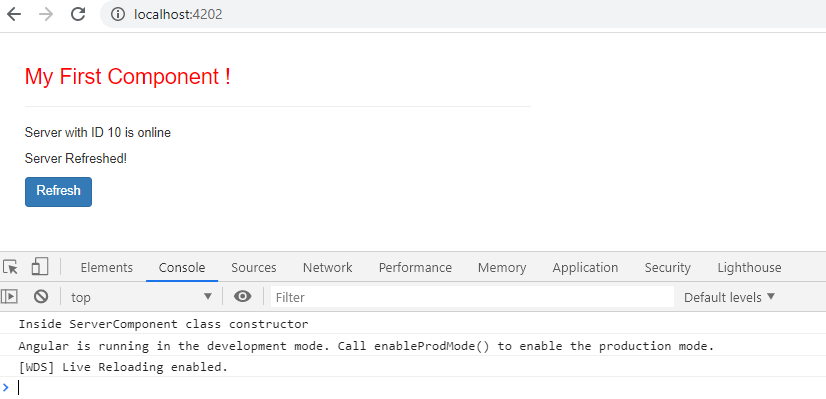
Output
Also See:
- HTML Property Binding in Angular : Data Binding
- Create a new component in Angular 9 with CLI and without CLI
- How to include Bootstrap to your Angular 9 Project ?
- Store access token in Ionic Angular App local storage securely
- Angular TypeScript Vs ES6 Vs ES5
- How to change angular port from 4200 to some other port ?
- Different ways to include JavaScript in HTML and its Purpose
- Port 4200 is already in use while running ng serve Angular CLI command
- String Interpolation in Angular 9
- This version of CLI is only compatible with Angular versions
- Your global Angular CLI version is greater than your local version
- Difference between Constructor and ngOnInit in Angular 9


