How Angular Encapsulates Styles using ViewEncapsulation ?
This tutorial guides you on how angular encapsulates styles using ViewEncapsulation. In order to understand ViewEncapsulation in Angular, you need to understand Shadow DOM technology. Let’s see in more detail about Shadow DOM technology and ViewEncapsulation in Angular with example.
What is Shadow DOM technology ?
Angular emulates by default Shadow DOM and automatically add unique attribute selectors names to all the elements in the components.
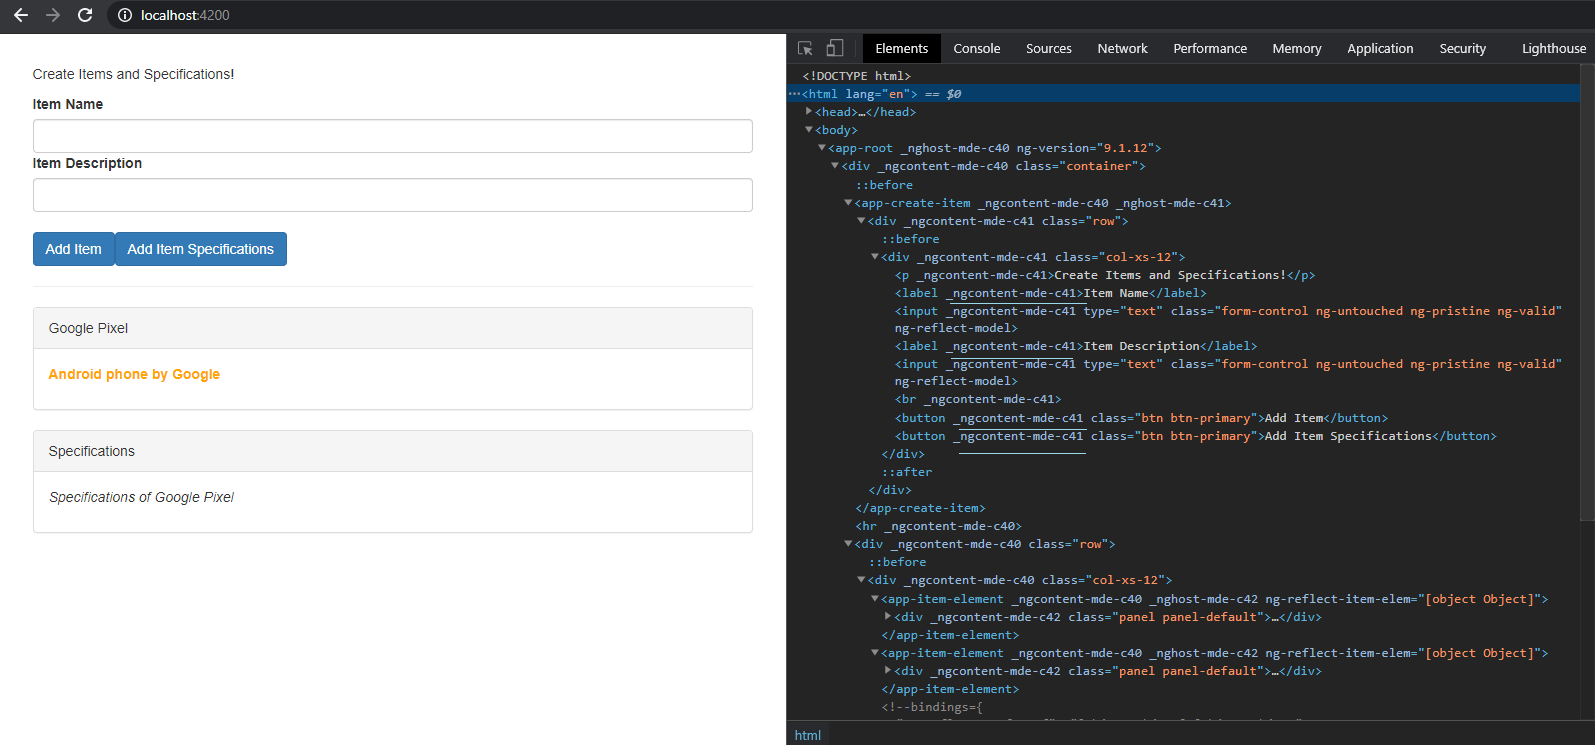
For example, if you see in the following picture while using inspect tool in the browser, it is clear that Angular automatically adds “_ngcontent-mde-c41” attribute selectors to all the the element’s styles defined for your component. Each element has it’s own shadow DOM behind it. Note, Shadow DOM is a technology that is not supported by all browsers.
Having said that Shadow DOM technology is not supported by all browser platforms. But this is how Angular emulates it and it is the default behavior of ViewEncapsulation in Angular.
What is ViewEncapsulation in Angular ?
ViewEncapsulation defines template and style encapsulation options for Angular components. As said before, the default behavior in Angular is “ViewEncapsulation.Emulated” option.
How Angular Encapsulates Styles using ViewEncapsulation ?
For example, as shown below even if you don’t set encapsulation: ViewEncapsulation.Emulated in the angular component, by default Angular emulates ViewEncapsulation which results in adding those automatic attribute selectors to all the elements as shown above.
This means that Emulated option emulate native scoping of styles by adding an attribute containing surrogate id to the Host Element and pre-processing the style rules provided via styles or styleUrls, and adding the new Host Element attribute to all selectors as shown in the picture above.
import { Component, Input, OnInit, ViewEncapsulation } from '@angular/core';

@Component({
  selector: 'app-item-element',
  templateUrl: './item-element.component.html',
  styleUrls: ['./item-element.component.css'],
  //encapsulation: ViewEncapsulation.Emulated // Default so no need to add this

})

export class ItemElementComponent implements OnInit {

  @Input() itemElem : {type: string, title: string, desc: string, spec: string};

  constructor() { }

  ngOnInit(): void {
  }

}
Difference between ViewEncapsulation.Emulated, None and Native
When you use ViewEncapsulation for your component, you can choose between three modes that Angular provides to you.
- Emulated – It is the default one. Therefore, you no need to add this.
- Native – Follows shadow DOM technology only in supported browsers.
- None – Don’t provide any template or style encapsulation.
If you add ViewEncapsulation.None and inspect in browser, you will see that those attribute selectors won’t be added automatically to the elements of the component by Angular.
@Component({
  selector: 'app-item-element',
  templateUrl: './item-element.component.html',
  styleUrls: ['./item-element.component.css'],
  encapsulation: ViewEncapsulation.None

})
Therefore, you can say that this component does not use ViewEncapsulation. And the other components you will still see those attribute selectors got added automatically by Angular. Note, if you add any style property in the CSS file that will effect globally.
For example, if you define the following style property i.e., for label element with yellow color. You could see this style being applied across all other components.
label {
    color: yellow;
}
Besides “None” you can also choose “Native” i.e., you can set ViewEncapsulation.Native. And ViewEncapsulation.Native uses the shadow DOM technology. This this should give same result as ViewEncapsulation.Emulated. But note only in browsers which is supported.
Conclusion
Finally, in most cases you would use ViewEncapsulation.Emulated but you could switch to “None” or “Native“. This is how Angular Encapsulates Styles using ViewEncapsulation and ensures by default only your component receives the styles. But it can be overridden.
Also See:
- How to Pass data from child to parent component – Angular 9 ?
- Access template reference variables from component class ?
- Pass variable from parent to custom child component – Angular 9 ?
- Can’t bind to ‘itemElem’ since it isn’t a known property of
- Best way to bundle an angular app for production deployment ?
- Type cannot be used as an index type.
- How to Modularize Angular Application – Angular 9 ?
- Declare model class and use in Angular component : Typescript
- Type definition for properties and object literal
- Get index of ngFor element using index as value in attribute
- Global Angular CLI version is greater than your local version
- Display different colors for odd/even rows using ngFor loop and ngClass
- TrackBy with *ngFor in Angular 9 : Example
- TypeError: Cannot assign to read only property
- Bind to an @Input alias of custom properties
- Bind to an @Output alias of custom events
- Upgrade Angular CLI to the latest version Angular 9 or 10 ?
- What is ngAfterContentInit with Example – Angular ?
- What is ngAfterViewInit with Example – Angular ?

